Jeans & Slippers Creations

Thursday, September 24, 2015

Cactus Garden

Hello everyone!

It's a beautiful fall day here.  A little brisk outside but the sun is shining brightly!

I have a layout to share that was submitted at Soul Scrappers for their SSQ28 Challenge.
It's always fun receiving FREE goodies to create a layout!!  :)

The theme for this challenge is "In the garden" and here's a list of goodies received:

- 2 white flowers
- Wood pp
- Burlap
- Wavy fiber ribbon
- Butterfly
- Colored beads
- Mini cupcake liner
- Small gold ribbon

Extra points will be awarded for  adding "color" on your layout and "changing colors" of the embellies received.

This is my creation titled, "Cactus Garden."
My son and grandson standing in the "cactus garden" when we visited San Antonio, Texas in 2010.  You get to see how huge they really are when someone is standing in front of them!

Paper: DCWV, Circle Punches, Stickers, Mists, Letters: American Crafts, Gesso, Stencil.
Sketch: Page Maps

ALL the embellies received were used to create my layout.  Below describes how I used them.

The burlap was cut into a circle, misted and beads added in the center to create a flower.
The butterfly was also misted... and I found a butterfly sticker that fit nicely on top of it and added a single bead at the top.
The wood pp was cut into circles, the edges distressed and misted, layering them on the larger circle.

Gesso was smeared along the outer edges of the cardstock.  I also used a circle stencil to create shapes along two of the edges.
The flower die cut was misted, a cardstock circle added for its center and beads within and around the cardstock.
A tiny strip of burlap was tucked under one of the cardstock layers.
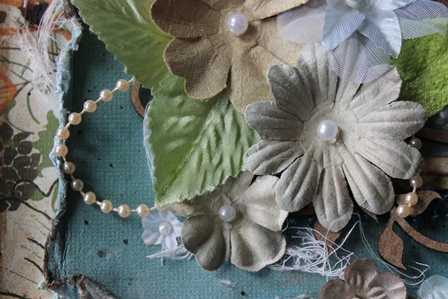
A closer look...

The tiny gold ribbon was added onto remaining strips of wood pp, cut into banners and tucked under one of the layers.

More burlap (misted) and tucked under the layers.

The fibers that were pulled from the burlap were knotted and used as photo corners... with a single bead in the center of each.

The right side of my page.

This flower die cut was also misted and beads added on each tip of the flower and in the center.  The stem was tucked under the photo mat.

The page title was added on the right of my page.
You can see the other photo corner above that.... and the other strip of burlap in the layers.

A closer look...


A closer look at the layered butterfly.  I only adhered the butterfly in the center so the "wings" would remain "free."

This bright, cheery die cut was cut from pp.
The remaining strip of burlap was tucked under the layer.

The wavy fiber ribbon was misted and tiny beads added randomly on it.


Thanks so much for stopping by!  :)


Tuesday, September 15, 2015

#Summer

Hello everyone!

So excited to finally have my kitchen finished (with only a few more things to add) and functional!

I have to share a few photos with you!!  


I love my new kitchen!!  :)


And now for some scrap fun!
I have the pleasure of hosting the Lift Challenge (LIFT30) at Soul Scrappers this month.

This is the Lift I have chosen:
Scrap page made by Maja design team member Gabrielle Pollacco based on the January Mood Board (challenge)

There are so many things to "lift" from this layout!  First of all... check out all those layers!  Love it!  Then there's the doily, the swirls, flowers, beads, distressed edges, misting, banners, border punched edges, inking, a few buttons added randomly, burlap and stitching.

And here's my example layout titled, "#Summer."
I loved everything about the lift layout above and incorporated "most" of it on my example.
Always a fun time when the four of us get together... share some yummy foods and chat about how our summer was going, and telling all sorts of fun stories!  This was taken on a beautiful summer day last year.

Supplies used:
Paper: The Paper Studio, DCWV, Veneer Swirls & Page Title: Creative Embellishments, Spray Inks, Doily, Cheesecloth, Crochet Doilies, Moon Shadow Mist, Perfect Pearls, Liquid Pearls, Border Punch, Lace Trim, Flowers/Leaves, Beads, Burlap, Wood Veneer Strip.

Flowers and doily were misted with several mists.  The doily was tucked under the punched border between the layers.  The leaves were white and misted with green mist.  The flower was also white and was misted with two or three different mists.

Above the photo, the cardstock was slathered with water so I could manipulate it by scrunching, curling and tearing.  The crochet doily was cut in half for this portion and tucked in the opening with tiny misted flowers added.

In the upper left I added the veneer swirls which were also misted.  The flowers were misted with Moon Shadow Mist which has a sheen to it... really cool.  Beads were added in the flower centers.
In the upper corner of the page, I cut the four corners off a square crochet doily and tucked one under each corner.

Below the photo is a larger cluster of swirls, flowers and leaves.  Under this cluster is a bow made with string beads.  Cheesecloth was tucked under the cardstock layer on the far left.

The other half of the crochet doily was tucked in the lower left.

The page title was misted several times and using my finger added liquid pearls to the edges of each letter so it would pop a bit more.
The larger banner under the page title was cut from a roll of wood veneer with the edges rubbed with mists.
A strip of lace was tucked below the banner.

A few close up photos...


Cheesecloth was tucked along the right side of the page also.


Love these swirls!!

The green mist on these otherwise boring white leaves turned out awesome!

 
Tiny flowers were tucked within the swirls.


Thanks so much for stopping by!  :)


Tuesday, August 4, 2015

Remember Forever

Hello everyone!

A huge thank you to all who have stopped by and visited my blog!  I truly appreciate it!

**************************

Do you love sketch challenges?
Well, each month, I am hosting a Sketch Challenge at Soul Scrappers.

This months sketch is from Page Maps.
If you haven't guessed already... I love Page Maps sketches!


And here is my layout titled, "Remember Forever."
This is the tattoo my daughter got in remembrance of her dad.  It was so heartwarming that she wanted to do something as special as this.  Makes my heart melt.  xoxo

Paper: DCWV, Brad, Stickers, Flower Beads, Gold Twine, Paper Punch.

Different font stickers were used for the page title and gold twine was looped beside the title.

Flower beads and one gold heart were added randomly on the squares.

Instead of adding arrows beneath the photo, this was the perfect place for my journaling.


A closer look.

Thanks so much for stopping by!
And I do hope you will check out Soul Scrappers for a wide variety of monthly challenges!   :)


Tuesday, July 14, 2015

The World Is Mine

Hello all,

It's a beautiful sunny day out!
Remodeling is still going on at my house.  I will thoroughly enjoy when it is finished!  :)

In the meantime, this layout was completed for a Soul Quest Challenge (SSQ27) at Soul Scrappers.  These challenges are so fun and each one has a theme.  This one is "On the Road."  All you have to do is complete the required number of challenges and get signed up.  You will receive FREE goodies to complete your project.

The goodies I received:
1. Bus/train ticket
2. Two pieces of pp
3. A piece of mesh
4. A piece of muslin
5. Some road signs
6. A piece of ribbon
7. A piece of twine
8. Some die cuts
9. Some rub ons
10. Some buttons

Along with trying to use up as much of the goodies as possible, the additional challenge is to use "COLOR."

And here's my layout titled, "The World Is Mine."
My dear friend and I, along with my dog, embarked on a road trip half way across the U.S. 
What an amazing and unforgettable journey we had!  :)

I used ALL the bits and bobs received. 
Paper: DCWV, Washi tape, Mists, Stickers, Stencils, Gesso, Paperclip, Gelatos, Dew Drops
Sketch: Page Maps

The heart is a lace sticker.  I used white cardstock behind the die cut so it would show up better.
A strip of the mesh was used as a border above the photos and behind the heart.

The flowers were stenciled with Gesso.  When that dried I misted them with several different mists.
The ribbon is used as a flower center with one end curling over the other flower.

Colorful washi tape is used as borders.  
In the upper corner I layered the buttons with silver dew drops.

The rest of the muslin was distressed and placed under the photo.  It was also misted with several mists.  You can just see the ends sticking out from behind the photo.
A couple of the pp received were cut in half and layered behind my page title.

Love these cute little car rub ons!
More buttons with dew drops on them. 

Another rub on car is in the upper corner.
The "ticket" was misted and added over the photo of Zoe sitting in the back seat of my car, content as ever!  :)

A closer look at the journaling and embellies received.

A button and silver dew drop were added in the center of the die cut.
One of the pp pieces were cut in half and tucked behind the photo... leaving the word "Adventure" peeking out.
A piece of the muslin was misted, twisted and knotted on each end, acting like a photo corner.

The long strip of pp I received was cut up... and this one was used to add journaling.  The small road signs were paper clipped on the side, and one more rub on was added in the lower corner.
The mesh was cut in half and used as a border on the photo to the far left.

A closer look at the flowers.  I traced and cut washi tape to place on some of the flower petals.  The other petals were rubbed with Gelatos to add a little more color.

A different washi tape was used for these flower petals.

I used a marker to cross out "Yours" and placed "Mine" stickers just below it...which was a more appropriate title for my trip!
I used some of the rub ons below the word "mine" and beside the word "the."

Thanks so much for stopping by!  :)